(For the Korean version, click here)
In our last post, we covered the basics of LVM. Today, we’re diving into the “killer feature” of LVM: Online Expansion.
If you’re a sysadmin, you’ve probably heard this before: “The /data partition is at 90%! We need more space ASAP!” In the old days, this was a total nightmare—backing up data, swapping drives, and downtime. With LVM, it’s a different story. You just plug in a new drive and “merge” it into your existing partition while the server is live. No downtime, no data loss.
Today, we’ll expand our existing /data area by adding a new 5GB hard drive.
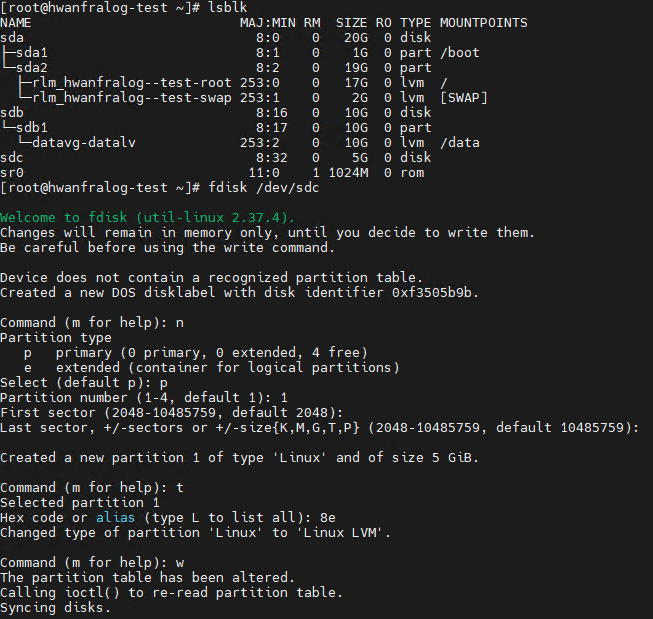
1. Prep the New Disk (fdisk)
Once your new disk (let’s say /dev/sdc) is detected by the system, we need to set the partition type to LVM, just like we did before.
# Check if sdc is detected
lsblk

# Start partitioning
fdisk /dev/sdc
The “Magic” Key Sequence:
- n : Create a new partition.
- p : Primary partition.
- 1 : Partition number 1.
- Enter twice : Use the full capacity.
- t : Change the type (Don’t skip this!).
- 8e : The hex code for Linux LVM.
- w : Save and exit.
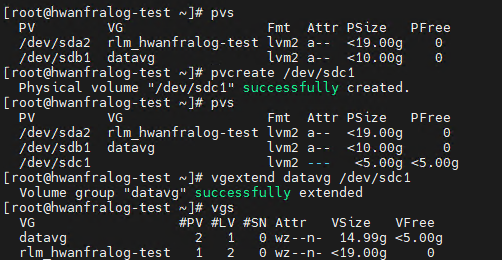
2. Grow the Pool (vgextend)
Now, we take that new physical resource and add it to our existing virtual pool, datavg. Think of it as adding more water to a tank.
# 1. Initialize the new partition as a PV
pvcreate /dev/sdc1

# 2. Add the new PV to the existing VG (datavg)
vgextend datavg /dev/sdc1

# 3. Check if the VG capacity actually increased (Look at 'Free PE')
vgs
The pool (VG) is now larger, but the actual volume (datalv) you’re using hasn’t changed yet.
3. Grow the Volume (lvextend)
The tank is bigger, so let’s actually expand the “pipe” or the volume we’re using. We’ll pour all that new space into datalv.
Bash
# Pour all the remaining free space in datavg into datalv
lvextend -l +100%FREE /dev/datavg/datalv

# Verify the new size
lvs
LVM-wise, you’re done. But if you run df -h, you’ll notice the size still looks the same. There’s one more step.

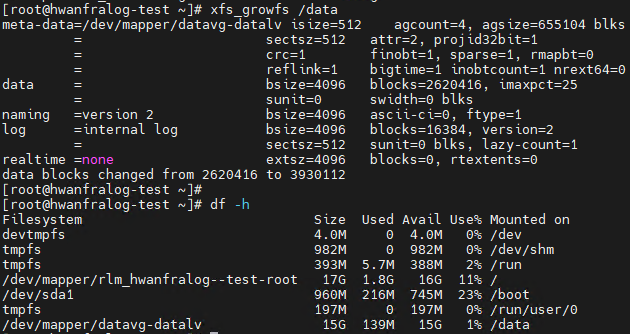
4. Tell the File System (xfs_growfs)
The disk structure is now larger, but the file system (XFS) is still “living in the past.” We need to tell the file system to “grow” into the new space.
# Grow the XFS file system (This works while it's still mounted!)
xfs_growfs /data

# Final verification
df -h
Note: If you are using EXT4 instead of XFS, use resize2fs /dev/datavg/datalv.
💡 An Engineer’s Take
“The best part about this is that it’s all done ‘online.’ No reboots, no maintenance windows. In cloud environments, you simply attach a volume in the console and run these few commands in the OS. It’s one of the most powerful tools in an engineer’s kit.”
🚀 What’s Next?
Now you can build and expand LVM like a pro. But to complete the cycle, you have to know how to tear it down safely. In [Linux Basics #8], we’ll wrap up the series by learning how to properly delete LVM volumes without trashing the system. Stay tuned!